Homebrew with the Miyoo Mini Plus
I love video games. Growing up, I received a Super Nintendo from my parents one year, and I've never strayed far from the hobby since. In fact, it's what inspired me to become a software engineer in the first place. The thought at the time was to venture into game development, but I quickly gravitated towards the web instead. That being said, I still find game development fascinating and maybe some day I'll build something cool 😉
For today though, I'd like to touch on a development of the last 20 or so years. Handheld devices that emulate the game consoles of yesteryear. Behold, the Miyoo Mini Plus:

This little GameBoy-inspired device has enough oomph to run everything up to PlayStation 1 games (via emulation, of course). It's linux-based and has a reasonably powerful dual-core ARM Coretex A7 cpu and a whopping 128 megabytes of ram!
Now, you may be thinking, "that's laughably low-spec." You'd be right! But the appeal of something like this is in the limitations: it has a very specific niche (4:3 aspect ratio gaming) and it executes on that well enough. Furthermore, it's cheap! I picked this one up off of Amazon for about 80 dollars and threw in some custom buttons from Etsy for another 20.
A brief history of retro handhelds
This isn't the first device of its kind, mind you. Rewind the clock about 20 years and there was a GameBoy Advance 'competitor' called the GP32 which the homebrew community embraced. I myself had a Dingoo A320 at one point, and kickstarted a device called the GCW Zero. These weren't amazing devices, but they were cheap, portable and enabled the playback of games libraries in a way that the bigger console manufacturers would eventually adopt.
 This might still work, but I can't be bothered to find a 5-pin mini-usb cable in my nest of wires.
What is different about these devices compared to the Nintendo Switch you can find at Best Buy is just how open they are. For instance, the photo of the Miyoo above isn't of the stock firmware but instead a community project called Onion. Not only do these projects add a slew of new features and software support (there's a library of open source games ported to the miyoo), but being an open device that runs linux it's relatively easy to write your own software for it!
On developing for embedded devices
You are still limited by the hardware of the device of course. No graphics acceleration in the Miyoo certainly makes writing games for it complicated. There's a patched version of SDL available for it, and a toolchain is available.
So, how difficult is it to take those two pieces and apply them to get a Hello World going? Not very! Continue on for a hello world how to.
Hello World Miyoo
If you clone the repository above and run the docker incantations prescribed in the README, you'll have a functional cross-compiler to begin building for the Miyoo. For the sake of demonstration, I've prepared a silly little SDL application at https://github.com/zbtnot/hello-miyoo for us to step through.
Clone the project into your workspace folder. Now from your toolchain shell, build the project with TARGET=miyoo make.
If everything went correctly, you should have a bin directory containing the project's assets and a Miyoo-friendly binary.
Copy bin to your device's SD card. You can now execute the application using Onion's build-in file explorer.
Pressing the A button will play a sound effect, and pressing the Menu button quits the program. Neat!

There are certainly more robust tutorials on SDL, so I won't duplicate their effort here. That said, what's going on when we run this program?
Let's dive into src/main.cpp to find out!
#include <SDL/SDL.h>
#include <SDL/SDL_image.h>
#include <SDL/SDL_ttf.h>
#include <SDL/SDL_mixer.h>

// Screen formatting
const int SCREEN_WIDTH = 640;
const int SCREEN_HEIGHT = 480;
const int BITS_PER_PIXEL = 32;

// Font formatting
const int FONT_SIZE = 64;

const int AUDIO_CHUNK_SIZE = 512;

// Button Helpers
const SDLKey BTN_A = SDLK_SPACE;
const SDLKey BTN_MENU = SDLK_ESCAPE;

// Resource paths
const char *imagePath = "assets/img/battleback8.png";
const char *fontPath = "assets/font/MMXSNES.ttf";
const char *bgmPath = "assets/bgm/Mars.wav";
const char *sfxPath = "assets/sfx/hop.wav";

const SDL_Color COLOR_WHITE = {255, 255, 255};
const SDL_Color COLOR_BLACK = {0, 0, 0};

const int LOOP_MUSIC = 1;

//...continued below
At the top here we have our includes for the SDL libraries.
As you might have guessed, we are leveraging the base SDL library as well as libraries for images, sound and fonts. All things necessary for a robust game!
Below the includes are a number of constants to keep things readable. The Miyoo's native resolution is 640x480 and of course we have strings for all of our resources.
// ...continued from above

int main(int argc, char **argv) {
    // init
    SDL_Init(SDL_INIT_VIDEO | SDL_INIT_AUDIO);
    IMG_Init(IMG_INIT_PNG);
    TTF_Init();
    Mix_Init(MIX_INIT_OGG);
    Mix_OpenAudio(
        MIX_DEFAULT_FREQUENCY,
        MIX_DEFAULT_FORMAT,
        MIX_DEFAULT_CHANNELS,
        AUDIO_CHUNK_SIZE
    );

    Mix_Chunk *sfx = Mix_LoadWAV(sfxPath);
    Mix_Chunk *bgm = Mix_LoadWAV(bgmPath);

    SDL_Surface *video = SDL_SetVideoMode(
            SCREEN_WIDTH,
            SCREEN_HEIGHT,
            BITS_PER_PIXEL,
            SDL_HWSURFACE | SDL_DOUBLEBUF
    );
    SDL_Surface *screen = SDL_CreateRGBSurface(
            SDL_HWSURFACE,
            SCREEN_WIDTH,
            SCREEN_HEIGHT,
            BITS_PER_PIXEL,
            0, 0, 0, 0
    );
    bool done = false;

    // load resources
    TTF_Font *font = TTF_OpenFont(fontPath, FONT_SIZE);
    SDL_Surface *text = TTF_RenderUTF8_Shaded(font, "Hello world", COLOR_BLACK, COLOR_WHITE);
    SDL_Surface *background = IMG_Load(imagePath);

    // play music
    int bgmChannel = Mix_PlayChannel(-1, bgm, -1);

    //...continued below
Here we have the start of our main entrypoint This is pretty large! A real application wouldn't simply dump everything into main, but for the sake of brevity let's pretend this is fine 😅 In this section we have our SDL initialization calls as well as resource loading. One interesting note is that our sound resources are WAV files. SDL_Mixer does support OGG-format but this does not appear to be functional on the Miyoo.
Let's keep going. After initialization, we start the game loop:
    // ...continued from above
    while (!done) {
        // poll for input
        SDL_Event event;
        while (SDL_PollEvent(&event)) {
            if (event.type == SDL_QUIT) {
                done = true;
                continue;
            }

            if (event.type == SDL_KEYUP) {
                switch (event.key.keysym.sym) {
                    case BTN_A:
                        Mix_PlayChannel(-1, sfx, 0);
                        break;
                    case BTN_MENU:
                        done = true;
                        continue;
                }
            }
        }

        // clear screen
        SDL_FillRect(screen, nullptr, SDL_MapRGB(screen->format, COLOR_WHITE.r, COLOR_WHITE.g, COLOR_WHITE.b));
        // draw image to screen
        SDL_BlitSurface(background, nullptr, screen, nullptr);

        // to center the text we need to know how wide the text is
        SDL_Rect textCentered = {
                (Sint16)((SCREEN_WIDTH - text->w) / 2),
                (Sint16)((SCREEN_HEIGHT - text->h) / 2),
                0,
                0
        };
        // TTF_RenderUTF8_Shaded puts a nice outlined box around our text, but it has too much height.
        // This clips it down to a nice size.
        SDL_Rect textClipped = {
                0,
                12,
                (Uint16)text->w,
                (Uint16)text->h
        };
        SDL_BlitSurface(text, &textClipped, screen, &textCentered);

        // draw screen to vram
        SDL_BlitSurface(screen, nullptr, video, nullptr);
        SDL_Flip(video);
    }

    //...continued below
There's a few things happening here. First, we handle system events and user input, and then turn our attention to updating the screen.
Should the user press the A or Menu buttons (instances of SDL_Key technically) we'll respond appropriately by playing our sound effect or ending the loop.
The graphics-handling code is next. This is the real meat and potatoes of the program.
First the program clears the screen surface with a call to SDL_FillRect, and then draws our background resource on top of that.
What follows is our Hello world text. There are some calculations made so the text renders nicely in the center of the screen.
This then gets drawn on the screen surface as well.
Lastly we draw the screen surface to our actual video device surface, and ask SDL to flip the video surface. We do that last part for the sake of reducing tearing, which isn't particularly useful for static imagery, but good hygiene.
When the game loop ends, we have to free the resources allocated. This last section of our main function does just that:
    // ...continued from above
    Mix_HaltChannel(-1);

    Mix_FreeChunk(sfx);
    Mix_FreeChunk(bgm);

    TTF_CloseFont(font);

    SDL_FreeSurface(text);
    SDL_FreeSurface(background);
    SDL_FreeSurface(screen);
    SDL_FreeSurface(video);

    // shutdown
    Mix_Quit();
    TTF_Quit();
    IMG_Quit();
    SDL_Quit();

    return 0;
}
That's really all there is to it! Having an incredible library such as SDL available to abstract away the hardware makes this program entirely portable, too. Uploading files to the Miyoo is possible using SCP or other protocols but for the sake of iteration is a bit slow. Fortunately, it's trivial to spin up a virtual machine with the same libraries.
In fact, I accounted for this in the project's Makefile.
Just run make without the TARGET=miyoo prefix and a native copy should build on an Ubuntu VM with the equivalent libraries installed.
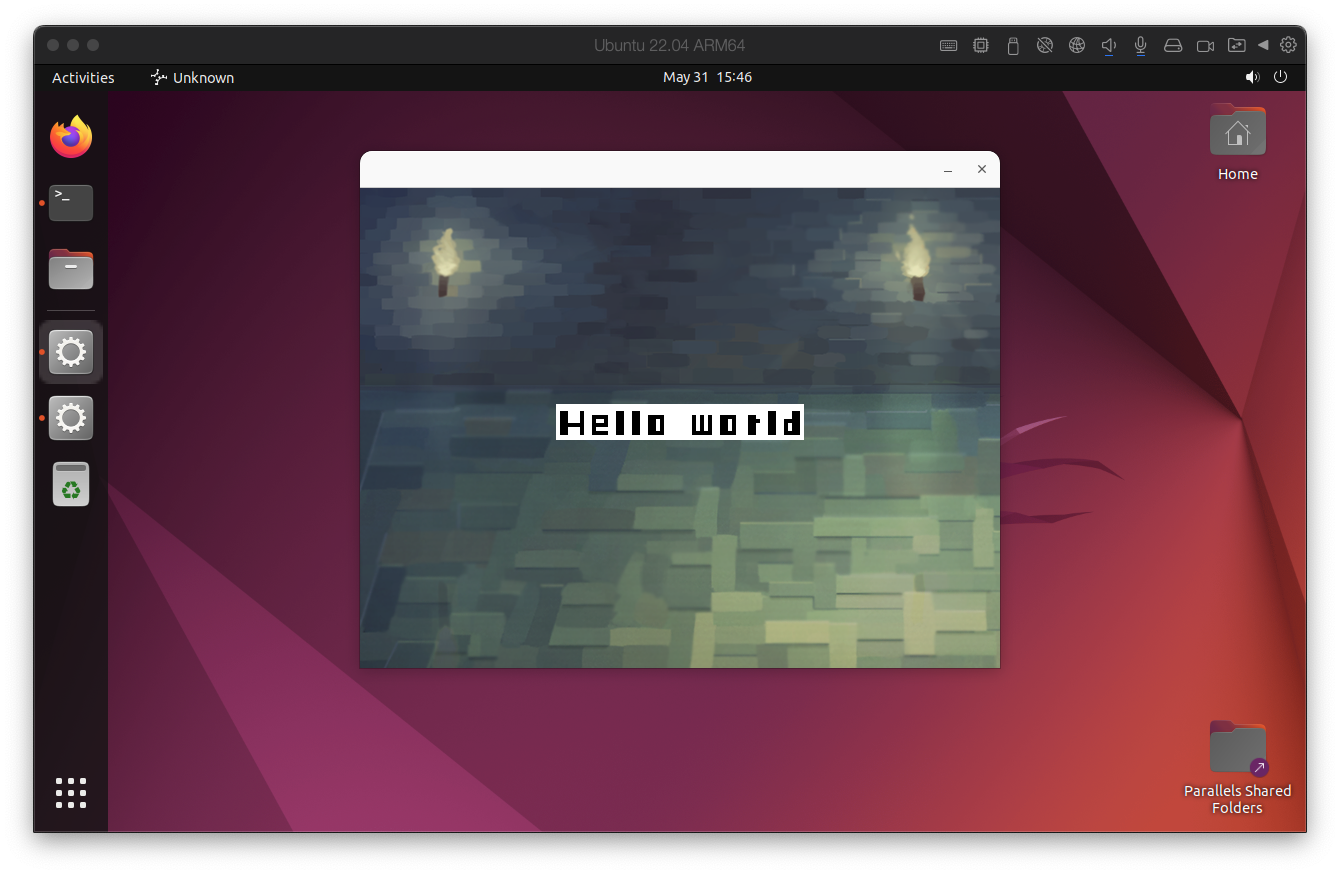
Here's the same code running on my Mac via Ubuntu:
What's next
So while the journey itself is interesting, the end result isn't much of a game. The next step would be to turn it into one! There's no shortage of simple yet fun games you could build just with the tools covered in this post.